Welcome to our Webapp
This application helps you calculate and find optimal solutions in Game Theory and Stable Matching Theory problems. Powered by Genetic Algorithms, Java Spring Boot, and the MOEA Framework, it delivers accurate and scalable solutions. A detailed manual is included to help you get started quickly and make the most of every feature.
Compability
| Platform | Version | Status | Note |
| Windows | 10 | N/A | Untested |
| Windows | 11 | Working | Tested |
| WSL | Ubuntu | Working | PwithFront stuck on unpacking node |
| Linux | Ubuntu | Working | Tested, Deployed |
| Linux | Debian | N/A | Untested |
| Mac | N/A | N/A | Untested |
Requirement
| Git | JDK 17 (Temurin/ OpenJDK) | Maven 3.8.3+ (or use wrapper in project) |
Local Installation
Step 1: Clone the Repository
First, clone the GA-Application-Java repository from GitHub.
git clone https://github.com/FitHanuSpecialSubject/GA-Application-Java.git
Step 2: Navigate to Directory
Change your working directory to the newly cloned repository folder.
cd GA-Application-JavaStep 3: Build the project
- Maven Wrapper (Recommended)
- Windows
Windows Terminal
.\mvnw.cmd clean install- Linux
Linux Terminal
bash ./mvnw clean install- System Maven (Requires Maven installation)
Terminal
mvn clean installStep 4: Install Webapp (Optional)
Optionally install the frontend application using Maven profile for full-stack development.
Terminal
mvn clean install -PwithFrontStep 5: Run Backend
Start the backend service using one of the following methods.
- Maven Profile
Terminal
mvn verify -DskipTests -PstartBEStep 6: Verify Backend
Confirm that the backend is running correctly by checking the browser output.
- Open your web browser
- Navigate to
localhost:8080
- Verify the application is running
Step 7: Run Webapp (Optional)
Start the frontend application for a complete development environment.
Terminal
mvn verify -DskipTests -Dskip.node-and-npm.install -PstartFEImportant Notes:
- Process runs separately from backend
- May need manual termination:
npx cross-port-killer 3000
- Server will start at
localhost:3000
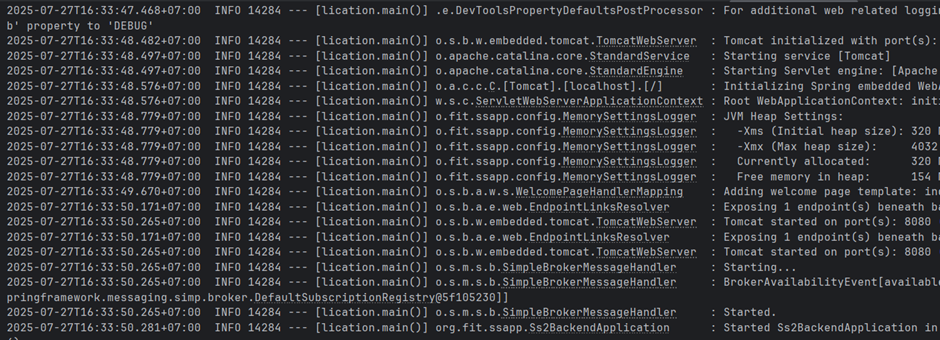
Step 8: Expected Output – Backend
This is what you should see when the backend service starts successfully.
Success Indicators:
- Server starts without errors
- Application context loads successfully
- REST endpoints are available
Step 9: Expected Output – Verification
This is what you should see on browser when application starts successfully.
Success Indicators:
- Development server starts on port 8080
- React application loads without errors
- Hot reload functionality works
- Browser opens automatically to localhost:8080

Solve Process
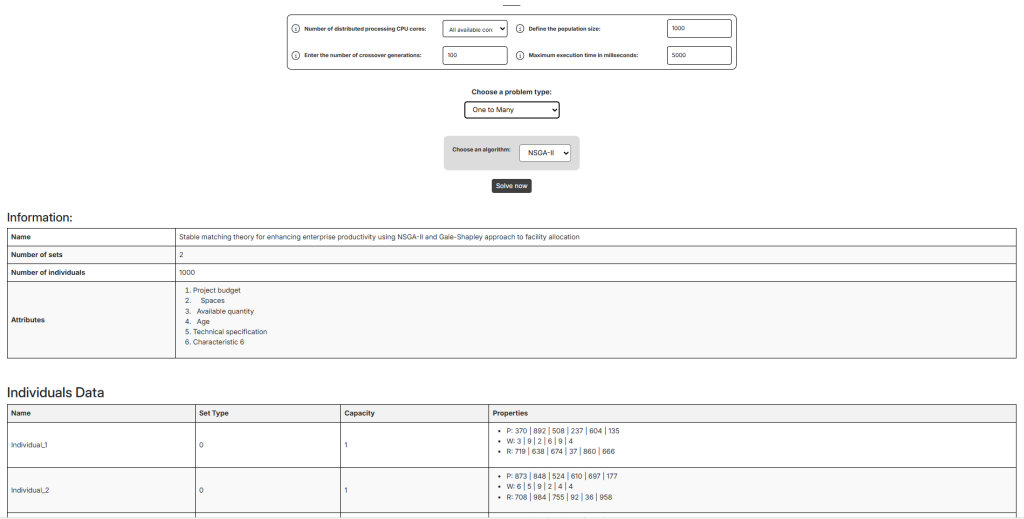
Step 1: Prepare Input Data
Prepare and upload your input data file following the required format specifications.
Optimization Tips:
- Use smaller datasets for initial testing
- Ensure input data is complete and syntax-corrected
- Verify data is correctly formatted

Step 2: Configure the Solver
Set up your solver parameters and select the appropriate algorithm for your problem type.
Configuration Parameters
| Algorithm Type | Select problem-specific algorithm |
| Distributed Cores | Number of CPU cores to utilize |
| Population Size | Size of the solution population |
| Crossover Generations | Number of genetic generations |
| Max Execution Time | Maximum optimization duration |
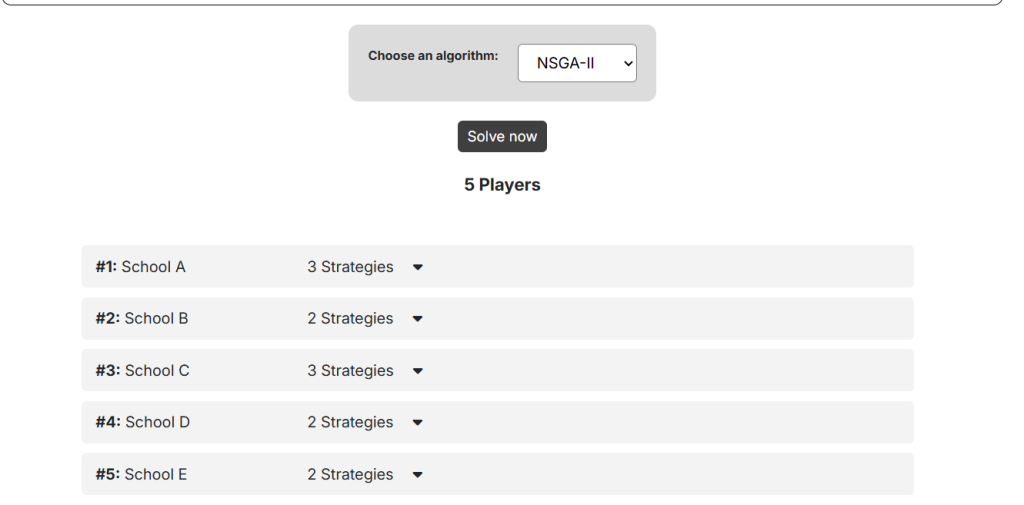
Step 3: Execute Solve Process
Start the optimization process and monitor the solving progress in real-time.
- Click “Solve Now”: Initiate the solving process
- Monitor Progress: Watch the optimization in real-time
- Wait for Completion: Results will appear automatically

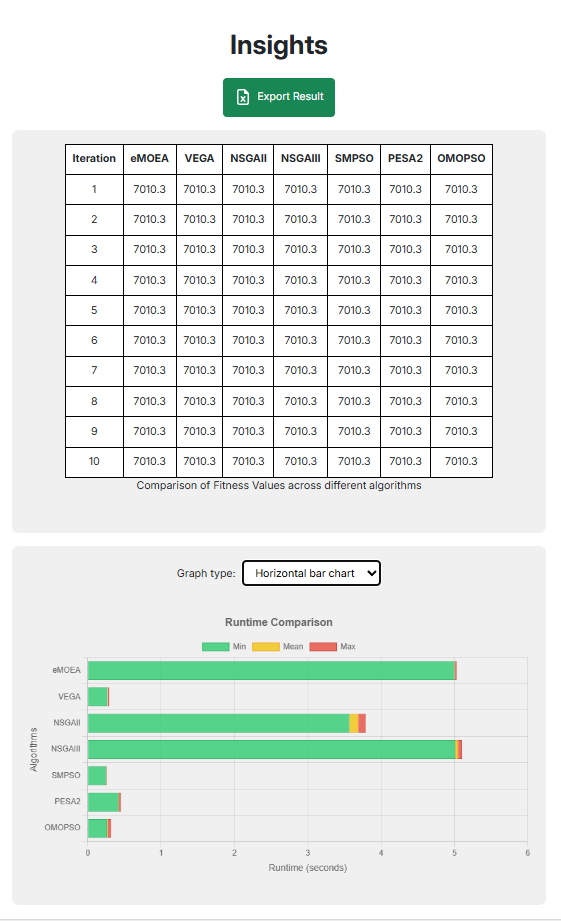
Step 4: Get Result Insight
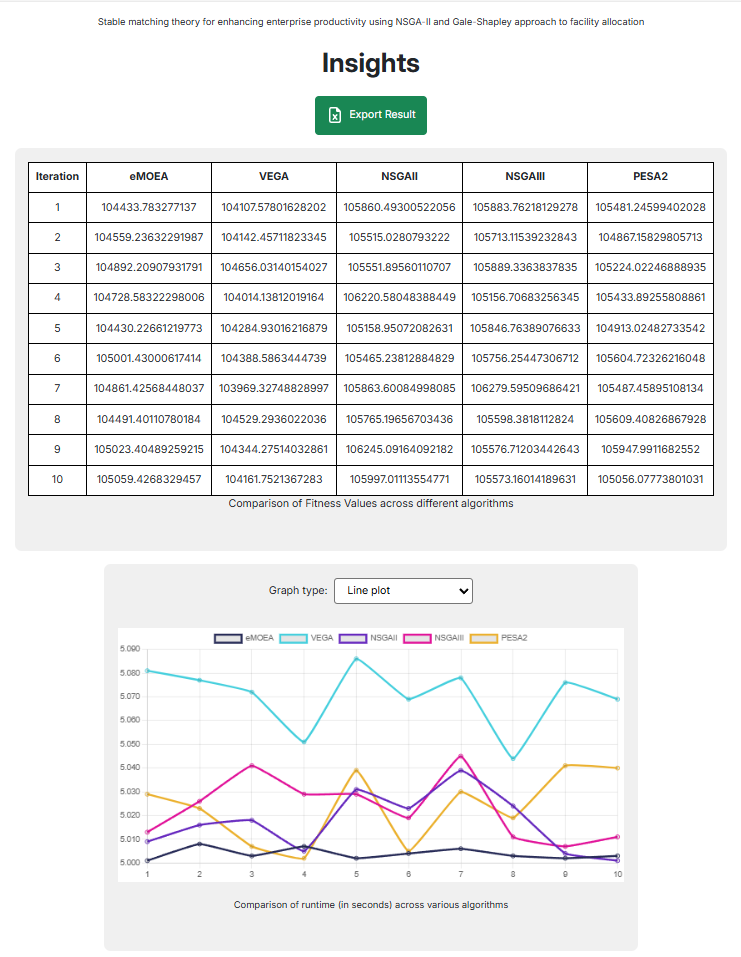
Generate comprehensive insights by running multiple algorithms for detailed analysis. After running GetInsight, users can export results and images using the “Export” feature.
Important Notices:
GetInsight may take considerable time. Do not close the browser tab or shut down your computer during execution to avoid losing your session.
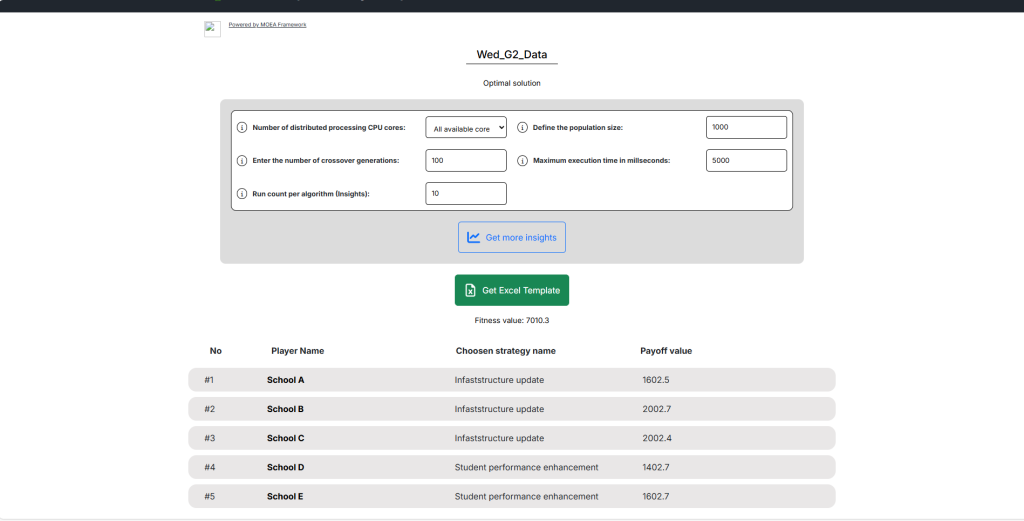
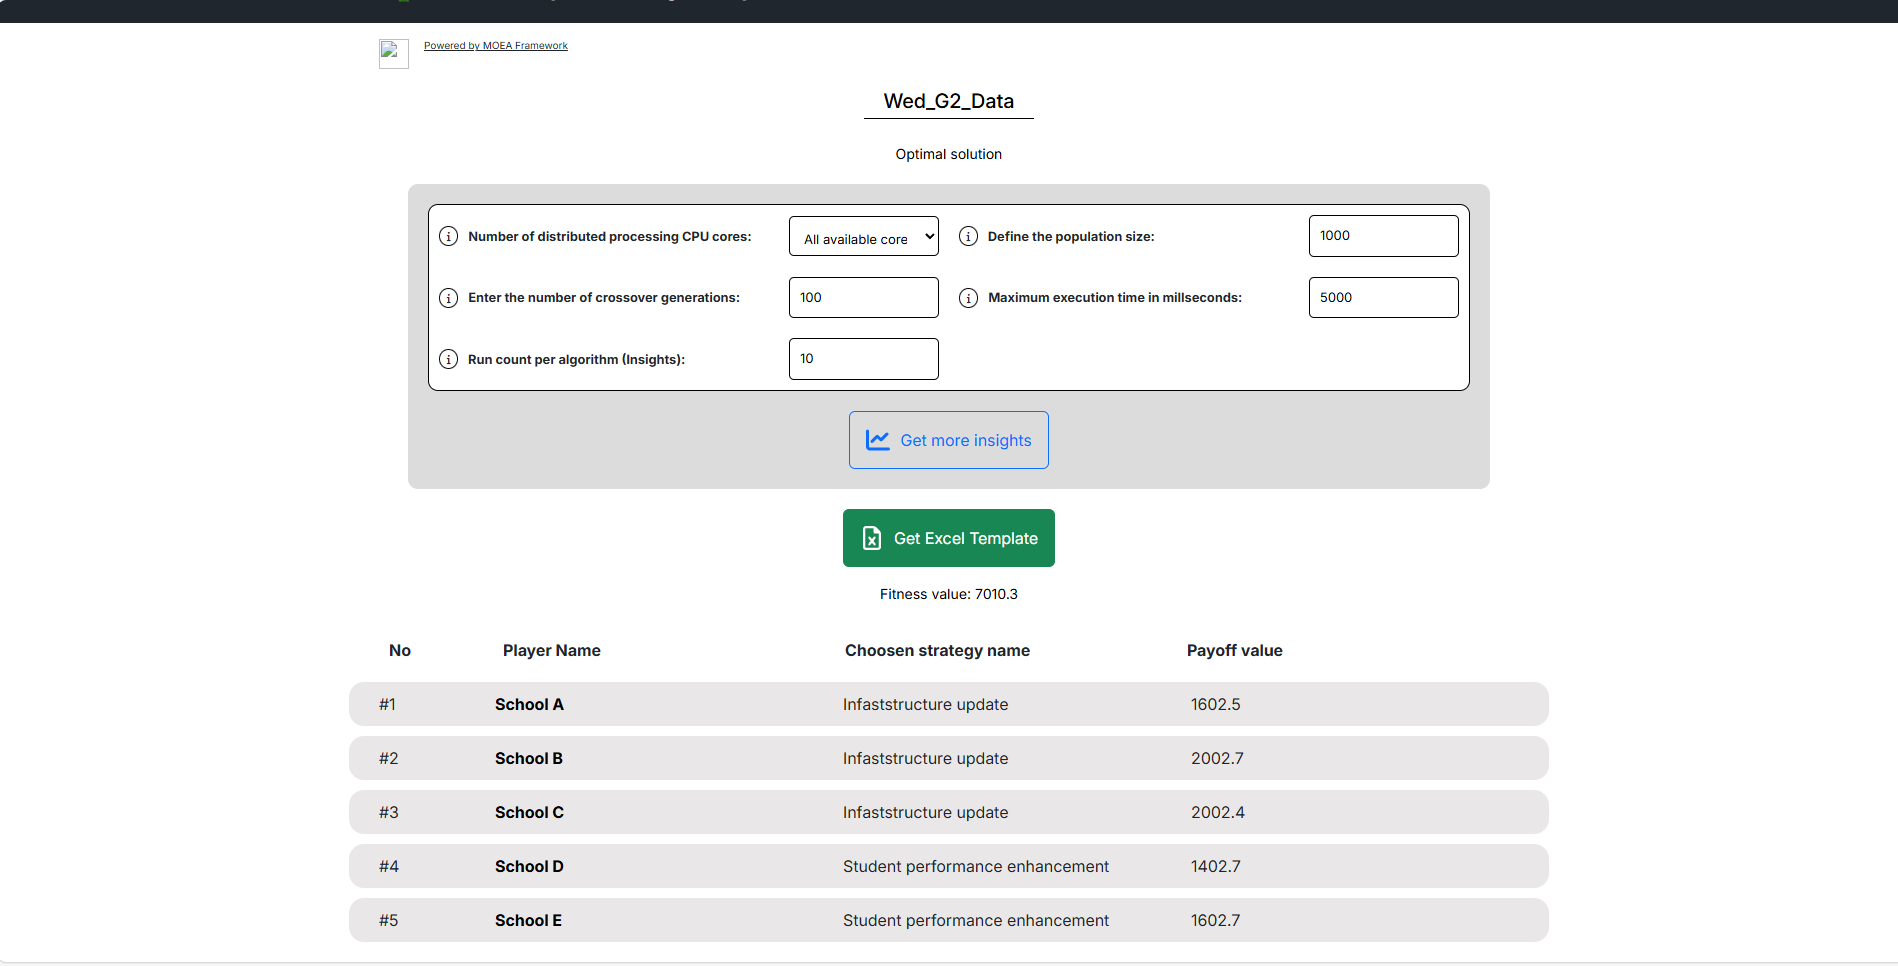
Step 5: Analyze GT Results
Examine Game Theory results including player strategies, scores, and performance metrics.
- Strategy Analysis: Review optimal player strategies
- Score Comparison: Compare player performance
- Multi-Run Analysis: Compare results across runs
- Export Results: Download final visualizations
Example Demo
Choose Algorithm
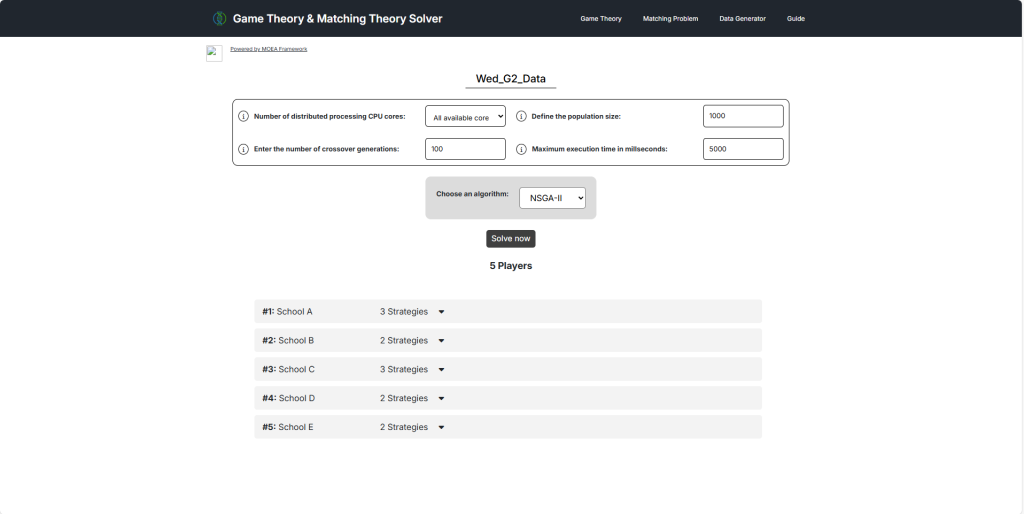
Results
Insights
Local Installation
Step 1: Clone the Repository
First, clone the GA-Application-Java repository from GitHub.
git clone https://github.com/FitHanuSpecialSubject/GA-Application-Java.git
Step 2: Navigate to Directory
Change your working directory to the newly cloned repository folder.
cd GA-Application-JavaStep 3: Build the project
- Maven Wrapper (Recommended)
- Windows
Windows Terminal
.\mvnw.cmd clean install- Linux
Linux Terminal
bash ./mvnw clean install- System Maven (Requires Maven installation)
Terminal
mvn clean installStep 4: Install Webapp (Optional)
Optionally install the frontend application using Maven profile for full-stack development.
Terminal
mvn clean install -PwithFrontStep 5: Run Backend
Start the backend service using one of the following methods.
- Maven Profile
Terminal
mvn verify -DskipTests -PstartBEStep 6: Verify Backend
Confirm that the backend is running correctly by checking the browser output.
- Open your web browser
- Navigate to
localhost:8080
- Verify the application is running
Step 7: Run Webapp (Optional)
Start the frontend application for a complete development environment.
Terminal
mvn verify -DskipTests -Dskip.node-and-npm.install -PstartFEImportant Notes:
- Process runs separately from backend
- May need manual termination:
npx cross-port-killer 3000
- Server will start at
localhost:3000
Step 8: Expected Output – Backend
This is what you should see when the backend service starts successfully.
Success Indicators:
- Server starts without errors
- Application context loads successfully
- REST endpoints are available
Step 9: Expected Output – Verification
This is what you should see on browser when application starts successfully.
Success Indicators:
- Development server starts on port 8080
- React application loads without errors
- Hot reload functionality works
- Browser opens automatically to localhost:8080
Solve Process
Step 1: Prepare Input Data
Prepare and upload your input data file following the required format specifications.
Optimization Tips:
- Use smaller datasets for initial testing
- Ensure input data is complete and syntax-corrected
- Verify data is correctly formatted
Step 2: Configure the Solver
Set up your solver parameters and select the appropriate algorithm for your problem type.
Configuration Parameters
| Algorithm Type | Select problem-specific algorithm |
| Distributed Cores | Number of CPU cores to utilize |
| Population Size | Size of the solution population |
| Crossover Generations | Number of genetic generations |
| Max Execution Time | Maximum optimization duration |
Step 3: Execute Solve Process
Start the optimization process and monitor the solving progress in real-time.
- Click “Solve Now”: Initiate the solving process
- Monitor Progress: Watch the optimization in real-time
- Wait for Completion: Results will appear automatically
Step 4: Get Result Insight
Generate comprehensive insights by running multiple algorithms for detailed analysis. After running GetInsight, users can export results and images using the “Export” feature.
Important Notices:
GetInsight may take considerable time. Do not close the browser tab or shut down your computer during execution to avoid losing your session.
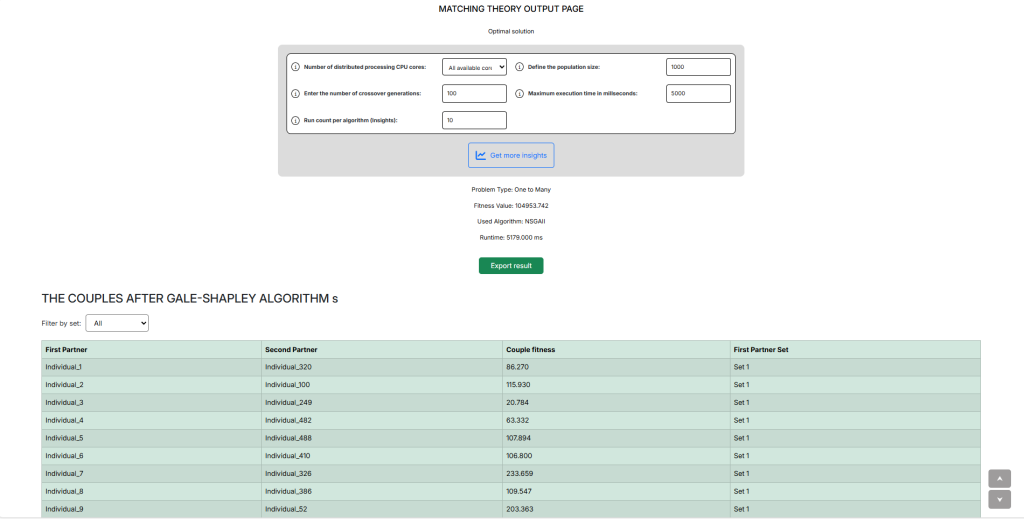
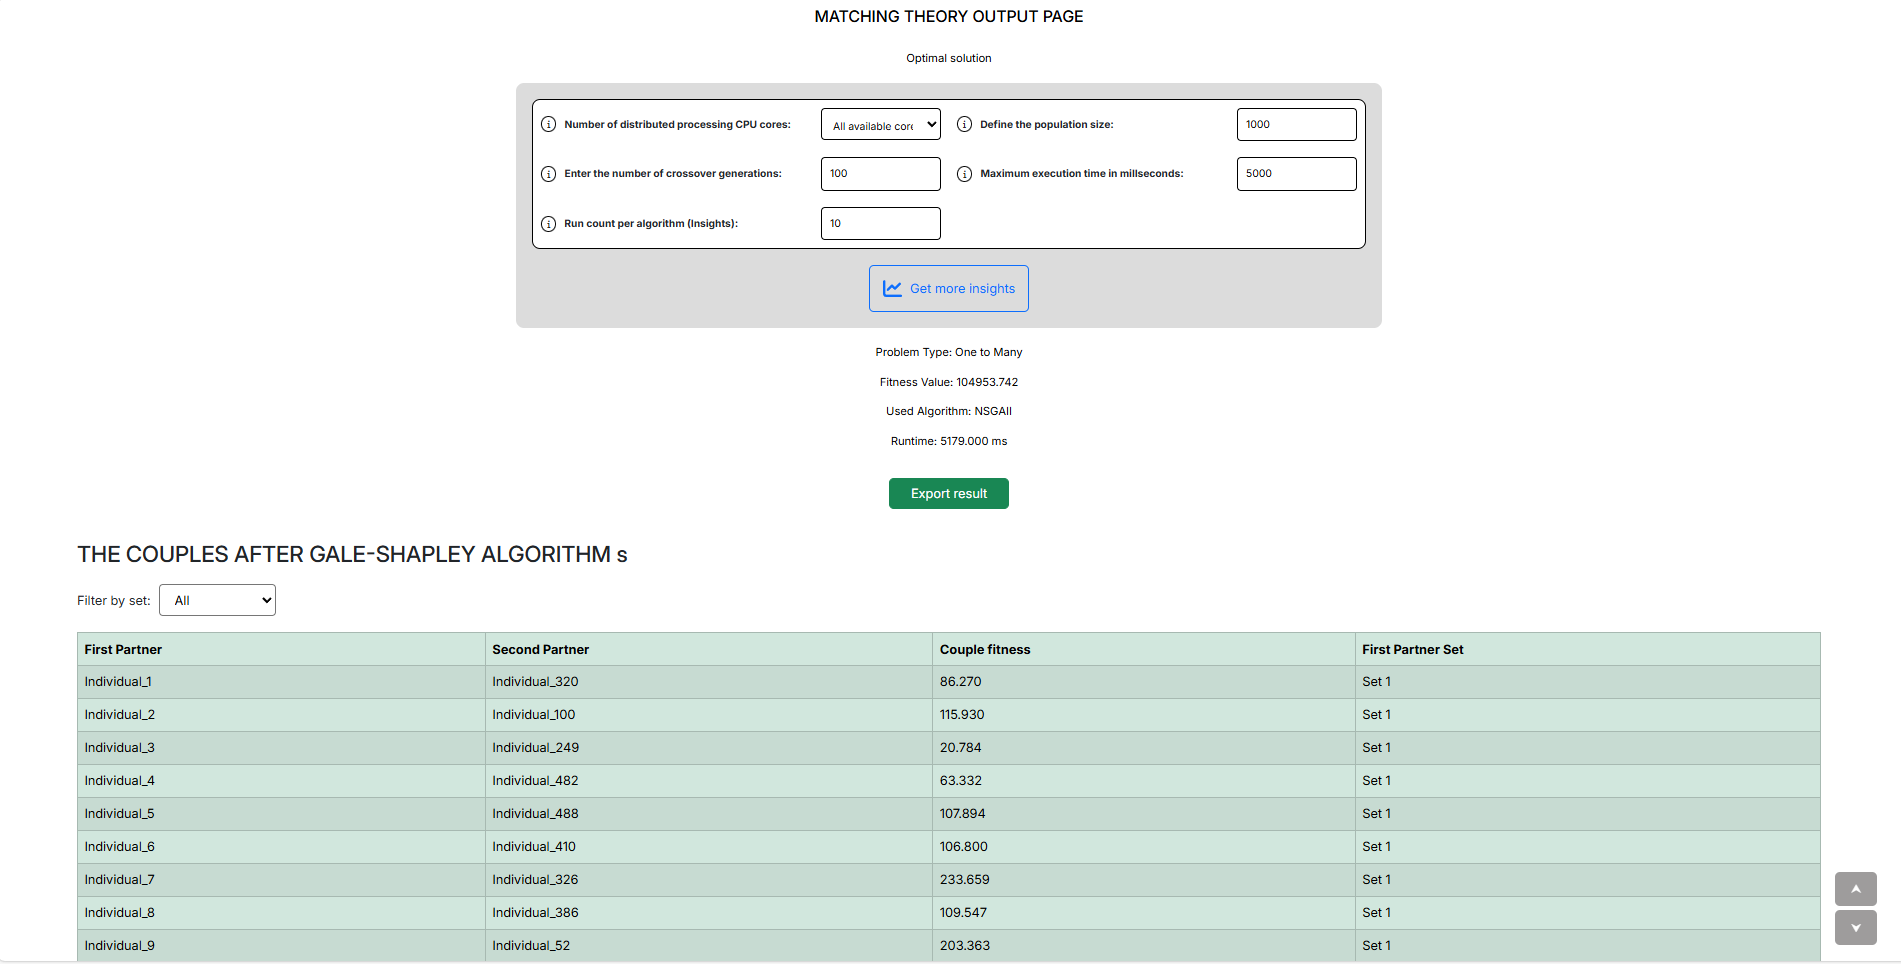
Step 5: Analyze SMT Results
Review the Stable Marriage Theory results showing matched pairs and optimization outcomes.
- Matched Pair Table: View successfully matched pairs
- Unmatched Items: Identify items that couldn’t be matched
- Visual Dashboard: Interactive charts and graphs
- Filter & Export: Focus on specific insights
Example Demo
Choose Algorithm
Results

Insights
Download Resources
Access the full documentation and project files from our Google Drive.